Introduction
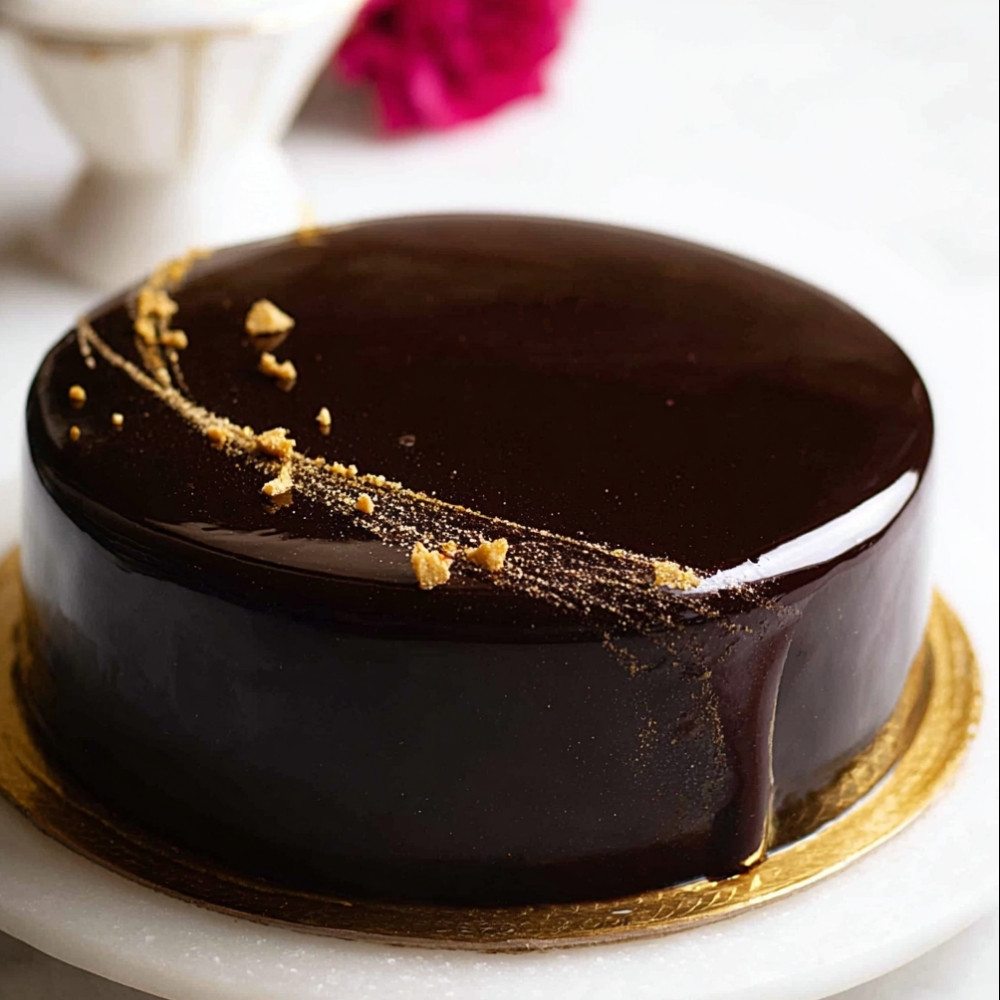
Creating a perfect chocolate mirror glaze is an essential skill for any home baker looking to add a touch of elegance to their desserts. This glossy and shiny glaze not only enhances the visual appeal of cakes but also adds a rich chocolate flavor. Whether you are preparing for a special occasion or simply want to impress family and friends, mastering this technique will elevate your baking to the next level.
Detailed Ingredients with measures
Sugar: 200g
Water: 100ml
Sweetened condensed milk: 200g
Unsweetened cocoa powder: 75g
Gelatin: 10g
Cold water (for gelatin): 50ml
Vegetable oil: 100ml
Prep Time
15 minutes
Cook Time, Total Time, Yield
Cook Time: 15 minutes
Total Time: 30 minutes
Yield: Enough to cover an 8-inch cake
Detailed Directions and Instructions
Step 1: Prepare the Gelatin
In a small bowl, sprinkle the gelatin powder over cold water and let it bloom for about 5-10 minutes.
Step 2: Heat the Cream and Sugar
In a saucepan, combine the cream, sugar, and glucose. Heat the mixture over medium heat until the sugar dissolves and the mixture is hot, but do not bring it to a boil.
Step 3: Add the Chocolate
Remove the saucepan from the heat and stir in the chopped chocolate. Allow the chocolate to sit for a moment, then stir until completely melted and smooth.
Step 4: Incorporate the Gelatin
Add the bloomed gelatin to the chocolate mixture and stir until fully dissolved and combined.
Step 5: Blend for Smoothness
Using an immersion blender, blend the glaze until it is smooth and glossy. Ensure there are no air bubbles trapped in the glaze.
Step 6: Cool the Glaze
Let the glaze cool to approximately 30-32°C (86-90°F) before using it to ensure a perfect pour.
Step 7: Glaze the Cake
Place your chilled cake on a wire rack set over a baking sheet. Carefully pour the glaze over the center of the cake, allowing it to spill over the edges. Use a spatula if needed to ensure an even coverage.
Step 8: Set the Glaze
Allow the glaze to set for at least 30 minutes at room temperature before serving or moving the cake.
Notes
Note 1: Consistency
Ensure the glaze is at the right temperature before pouring to achieve a smooth finish.
Note 2: Storing
The mirror glaze can be stored in an airtight container in the refrigerator for a few days. Reheat gently to restore its pourable consistency.
Note 3: Temperature Control
For the best results, work in a cool environment to prevent the glaze from setting too quickly.
Note 4: Chocolate Quality
Use high-quality chocolate for a rich flavor and glossy finish in the glaze.
Note 5: Alternative Sugars
If glucose is unavailable, light corn syrup can be used as a substitute.
Cook techniques
Preparing the Glaze
The chocolate mirror glaze requires careful preparation. Make sure to use quality chocolate to get a smooth finish. The mixture should be heated gently to avoid scorching and ensure all ingredients are well combined.
Achieving the Right Consistency
Maintaining the right consistency is crucial for a perfect mirror glaze. The mixture should be thick enough to coat the dessert evenly but still liquid enough to pour. The optimal temperature for pouring is around 90°F (32°C).
Applying the Glaze
When applying the glaze, make sure the dessert is completely frozen. This prevents the glaze from soaking in and helps it set properly. Pour the glaze slowly and evenly for the best finish.
Storing the Glaze
If you have leftover glaze, store it in an airtight container in the refrigerator. Reheat gently before use, but be cautious not to bring it back to boiling point.
FAQ
Can I use milk chocolate instead of dark chocolate?
Yes, you can use milk chocolate, but it will alter the flavor and color of the glaze. Dark chocolate is preferred for a richer taste.
How do I know if my glaze is too thick?
If the glaze doesn’t flow easily when poured, it may be too thick. You can add a small amount of water and reheat to achieve a better consistency.
What desserts work best with mirror glaze?
Mirror glaze is best suited for mousses or cakes with a smooth surface. It can also be used on cheesecakes or gelatin desserts.
Can I color the glaze?
Yes, you can add gel food coloring to achieve different colors. Make sure to use oil-based colors to prevent seizing.
How do I prevent bubbles in my glaze?
To avoid bubbles, carefully stir the glaze and use a spatula. You can also let it rest for a few minutes before using it, allowing bubbles to rise to the surface.
Conclusion
The chocolate mirror glaze is an exquisite finishing touch that can elevate your desserts, providing not only a stunning visual appeal but also a rich and decadent chocolate flavor. With the right techniques and ingredients, you’ll be able to create a glossy and smooth glaze that will impress both your guests and your taste buds.
More recipes suggestions and combination
Glazed Chocolate Cheesecake
Pair your chocolate mirror glaze with a rich and creamy cheesecake for a delightful dessert that satisfies every craving.
Chocolate Eclairs
Use the mirror glaze to cover chocolate eclairs, adding an extra layer of elegance and flavor to this classic pastry.
Chocolate Mousse Cake
Top a velvety chocolate mousse cake with the mirror glaze for an indulgent treat that looks as good as it tastes.
Layered Chocolate Torte
Drizzle or pour the mirror glaze over a layered chocolate torte, enhancing both the presentation and richness of the dessert.
Brownie Cake
Transform a simple brownie cake into a showstopper by finishing it with a shiny chocolate mirror glaze.
Chocolate Cream Puffs
Coat chocolate cream puffs with the glaze for a sophisticated touch that complements the creamy filling.

Leave a Reply